- Published on
Part 2: Static Application Security Testing (SAST) with Semgrep
- Authors

- Name
- Benson Macharia
- @benson-macharia
This article is a continuation of the previous post, where we configured secrets detection in a Jenkins-based DevSecOps pipeline running on an AWS EC2 instance. In that guide, we walked through the step-by-step integration of the open-source tools TruffleHog and Yelp Detect-Secrets into a Jenkins pipeline to identify sensitive information in source code.
In this article, we focus on integrating Semgrep into the same DevSecOps pipeline for Static Application Security Testing (SAST).
Static Application Security Testing (SAST)
Static Application Security Testing (SAST) is a security testing method that analyzes application source code, binaries, or bytecode without executing the application. It helps identify security vulnerabilities such as hardcoded secrets, insecure coding practices, and common flaws like SQL injection or cross-site scripting early in the development lifecycle. By running SAST during development or as part of a CI/CD pipeline, organizations can detect and fix security issues before the application is deployed.
In the following steps, we will install and configure Semgrep in a Jenkins pipeline to perform SAST.
Semgrep is a lightweight and fast Static Application Security Testing (SAST) tool that scans source code for insecure patterns using predefined or custom rules. It supports multiple programming languages, produces developer-friendly results, and integrates easily into CI/CD pipelines, making it well-suited for DevSecOps workflows.
Step 1: Install Semgrep on the Jenkins EC2 Instance
Semgrep must be installed on the EC2 instance where Jenkins is running so it can be executed as part of the pipeline.
- First, SSH into the Jenkins EC2 instance and install the required dependencies
$ sudo apt update
$ sudo apt install -y python3 python3-pip
- Next, install Semgrep using pip
$ pip3 install semgrep
- Verify the installation to ensure Semgrep is available on the system
$ semgrep --version
1.143.0
Step 2: Choose Semgrep Rules for SAST
Semgrep uses rules to identify security issues in source code. These rules can be:
- Official Semgrep-managed rules
- Language-specific rules
- Custom rules written by the user.
For CI/CD pipelines, Semgrep provides a recommended ruleset called p/ci, which is designed for fast and practical scans in automated environments.
$ semgrep --config p/ci
This ruleset detects common security issues while keeping scan times low, making it ideal for Jenkins pipelines.
Step 3: Add Semgrep to the Jenkins Pipeline
Once Semgrep is installed, the next step is to integrate it into the Jenkins pipeline. Semgrep will scan the source code that was checked out during the pipeline’s checkout stage.
Step 4: Run Semgrep and Capture Results
The scan will be executed in the Jenkins workspace and the results will be saved in JSON format for easy review and reporting.
stage('SAST Scan') {
    steps {
        echo 'Running Semgrep SAST scan ...'

        // Run Semgrep scan using recommended CI rules
        sh 'semgrep --config p/ci --json > semgrep-results.json'

        // Archive scan results
        archiveArtifacts artifacts: 'semgrep-results.json', allowEmptyArchive: true

        // Read and print results to console
        script {
            def semgrepResults = readFile('semgrep-results.json')
            echo "Semgrep Scan Results: ${semgrepResults}"
        }
    }
}
Everything together
The final consolidated jenkins pipeline script will be as shown below.
pipeline {
    agent any

    stages {

        stage('Checkout') {
            steps {
                // Clone the repository master branch
                echo 'Cloning the code from our repo ...'
                git branch: 'master', url: 'https://github.com/ScaleSec/vulnado.git'
            }
        }

        stage('Secrets Detection') {
            parallel {

                stage('TruffleHog') {
                    steps {
                        echo 'Running TruffleHog scan ...'

                        // Run TruffleHog scan on the repository
                        sh 'trufflehog git https://github.com/ScaleSec/vulnado.git --json --no-update > trufflehog-results.json'

                        // Archive scan results
                        archiveArtifacts artifacts: 'trufflehog-results.json', allowEmptyArchive: true

                        // Print results to console
                        script {
                            def truffleHogResults = readFile('trufflehog-results.json')
                            echo "TruffleHog Scan Results: ${truffleHogResults}"
                        }
                    }
                }

                stage('Detect Secrets') {
                    steps {
                        script {
                            try {
                                // Run detect-secrets scan
                                sh 'detect-secrets scan > detectSecretsResults.json'

                                // Archive scan results
                                archiveArtifacts artifacts: 'detectSecretsResults.json', allowEmptyArchive: true

                                // Print results to console
                                def detectSecretsResults = readFile('detectSecretsResults.json')
                                echo "Detect Secrets Scan Results: ${detectSecretsResults}"
                            } catch (Exception e) {
                                echo "Error running detect-secrets: ${e.getMessage()}"
                            }
                        }
                    }
                }
            }
        }

        stage('SAST Scan') {
            steps {
                echo 'Running Semgrep SAST scan ...'

                // Run Semgrep using recommended CI rules
                sh 'semgrep --config p/ci --json > semgrep-results.json'

                // Archive scan results
                archiveArtifacts artifacts: 'semgrep-results.json', allowEmptyArchive: true

                // Print results to console
                script {
                    def semgrepResults = readFile('semgrep-results.json')
                    echo "Semgrep Scan Results: ${semgrepResults}"
                }
            }
        }
    }
}
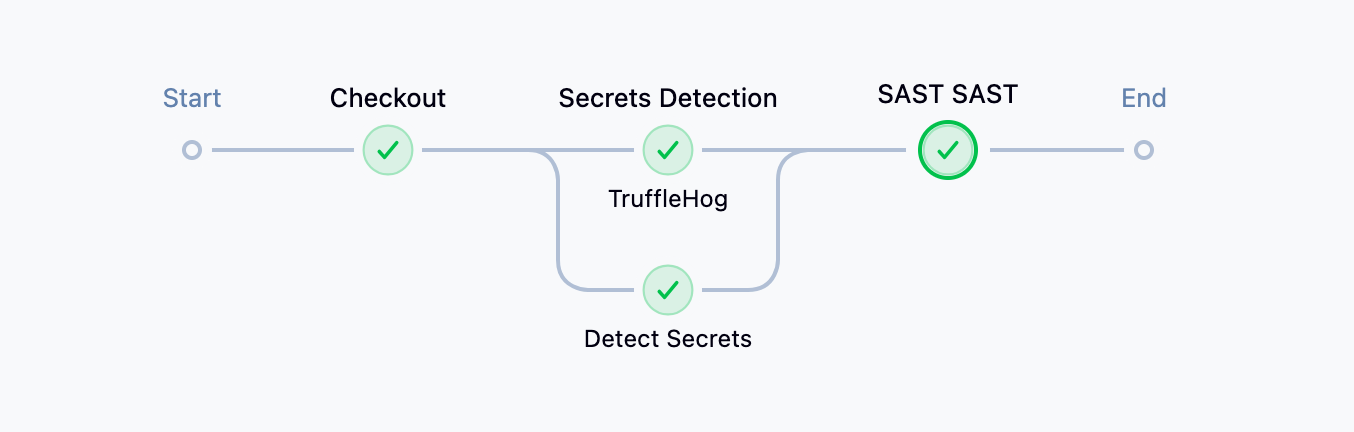
The pipeline overview will be similar to the image below, and the SAST scan results can be viewed directly in the pipeline logs or by reviewing the generated semgrep-results.json file.
Next steps
This concludes Part 2 of the series. In the upcoming Part 3, we will continue enhancing the DevSecOps pipeline by adding additional security stages, including Software Composition Analysis (SCA) and Software Bill of Materials (SBOM) generation. These additions will help improve visibility into third-party dependencies, identify known vulnerabilities in open-source components, and strengthen overall software supply chain security.